
Posted by Yi Yang (Software Engineer).
 Staying on top of your app’s performance is important to ensure your users can use your app easily. When an app experiences issues like animation junk, freeze frames, and high memory usage, it negatively affects the user experience, which can lead to low ratings or app deletion. To solve these performance problems, we first need the right tools to accurately measure the application’s performance.
The debugger allows you to use features useful for development, such as apply changes, work with the debugger, or the database inspector. Additionally, it also allows profiling tools to check the state of a running application that is not available for a released build.
Under the hood, the bug builds. Correctable Point to true in the android reflector.
While useful, the debugging construct is designed to provide additional information at the expense of performance. Because when Correctable Granted, many compiler optimizations are missing.
.gif) |
To solve that problem, an account called the Android platform was introduced Can be explained. Many profiling tools measure timing information, enabling more than just debug build performance. Can be explained Available on devices running Android 10 or higher.
AndroidManifest.xml
Let’s see another screenshot. At this time, on the left side, a Can be explained Release App and Unmodified Release App on the right. There is little performance difference between the two.
 |
with Can be explainedNow you can accurately measure the time information instead of correcting the construction.
This feature is designed in a product where application security is very important. So we decided to only support profiling features like Callstack Sampling and System Trace, where timing is critical. The memory profile only supports the native memory profile. Energy Profiler and Event Timeline are not available. A complete list of disability characteristics can be found here. All these restrictions are put in place to keep your app data safe.
Now you know what it is Can be explained tag does, let me show you how to use it. There are two options: automatic and manual.
Option 1: Use the option in Android Studio.
In Android Studio Flamingo and Android Gradle Plugin 8.0, all you need to do is select this option from the Profile drop-down menu in the Run toolbar: “Profile at a low price”. Android Studio will then build an app that can specify your current build type and attach the profile. It works for any build type, but we strongly recommend that you profile the release build that your users see.
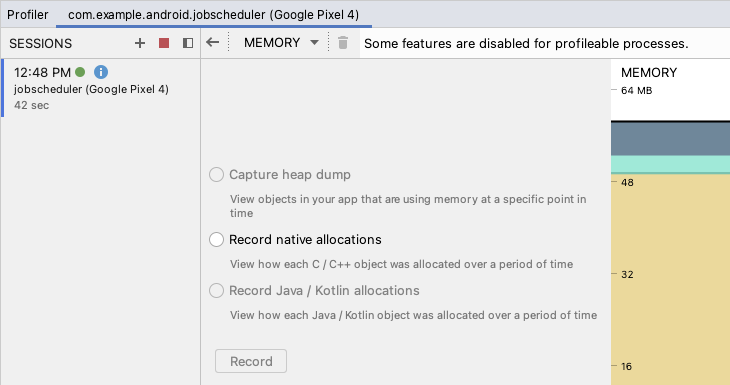
 There is a visual indicator with a banner message when an app is profiled. Only CPU and memory profilers are available.
In Memory Profiler, only the native allocation capture feature is available for security reasons. |

 |
This feature is great for simplifying the local profiling process, but it only applies when profiling in Android Studio. So, if you want to diagnose performance issues in production, or if you’re not ready to use the latest Android Studio or Android Gradle plugins, manually configuring your app can still be useful.
Option 2: Manual configuration.
It takes 4 steps to activate manually Can be explained.
1. Add this line to your AndroidManifest.xml.
AndroidManifest.xml
2. Switch to the release build type (or any build type that cannot be edited).
 |
3. Verify that the signing key is configured. To prevent corrupting your release signing key, you can temporarily use your error signing key or set up a new key just for the profile.

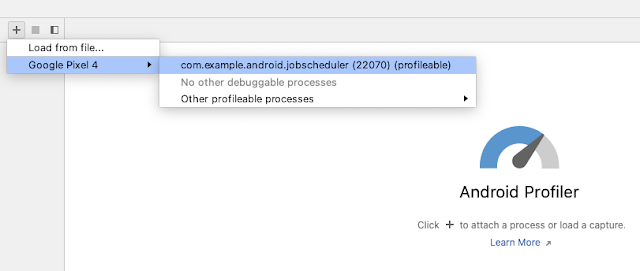
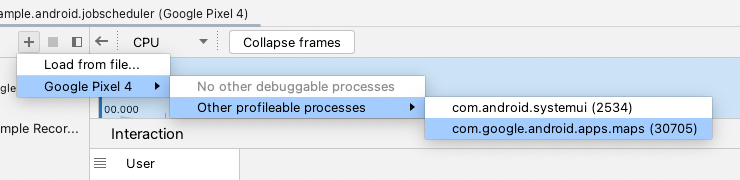
4. Build and run the app on a device running Android 10 or higher. You now have an app that can be defined. You can then attach the Android Studio profiler by launching the profiler tool window and selecting the application process from the drop-down list.
 You may wonder if it is safe to leave many of you. Can be explained Professional branding in production and the answer is yes. This tag is designed to be used in release builds to enable local profiles. No memory data can be read by the host profiling tools and shell process. Only overlapping traces are read, which are typically hidden or unmarked in a release build.
In fact, many first-party Google apps, such as Google Maps, send their apps to the Play Store to profile potential apps.
 In conclusion, profiling the error build can distort the performance and therefore the release build in Can be explained Account enabled. In conclusion, profiling the error build can distort the performance and therefore the release build in Can be explained Account enabled. |
Here is a table showing which construction type should be used:
To learn more about profile constructs, start by reading the documentation and user guide.
We hope you can make your app faster and smoother with these tools provided by the Android team.